vmware

All posts tagged vmware

Found myself in a predicament just the other day. I had spent several hours building out template VMs for a few servers, installing vmtools, applying all the latest updates, running sysprep, etc. At the end of that effort, I exported them to .ova files and removed the original VMs. Then I decided I might want to test these .ova exports to make sure they work. Well, guess what? I found myself with broken .ova files that would not import.

The error message, “OVF Deployment Failed: File ds:///vmfs/volumes/uuid/_deviceImage-0.iso was not found” led me to VMware KB article 2034422. The resolution, of course, required use of the original source VMs which I had over zealously deleted earlier. Thankfully, the article gave enough detail about the issue that I was able to work up the following little hack to repair my damaged .ova files:

  1. I extracted the contents of the .ova files using tar. This works because .ova files are just uncompressed tar archives. You could also use 7zip on Windows.
  2. Inside, there was one .mf or manifest file, one .ovf file, and one .vmdk. There would be more .vmdk files if I had more drives associated with the VMs.
  3. I edited the .ovf file to change the text “vmware.cdrom.iso” to “vmware.cdrom.remotepassthrough”. The reason for the failure was that the import process was trying to mount a non-existent vmware tools iso image.
  4. Once edited, the SHA1 sum of the .ovf file had changed, causing it to not match the sum contained in the manifest. I generated a new SHA1 sum and replaced the original in the .mf manifest file.
  5. Finally, I re-archived the files with tar, making sure to change the extension on the end back to .ova. The tricky bit to this is to make sure you add the files to the archive in the correct order. The .ovf has to be the first file in the archive. Use tar cvf archive.ova vm.ovf to create, then tar uvf archive.ova *.mv *.vmdk to append the rest of the files. Note that I couldn’t get 7zip to archive these in order. I had to use GNU tar from an Ubuntu VM.

I was then able to successfully import the .ova files back into my vSphere environment.

The Setup

A client called in with an interesting problem. They had recently performed a planned outage due to a power issue at their premises, but upon powering everything back up one of their hosts was unable to access the iSCSI SAN volumes. Fortunately, they were able to bring up all of the VMs on the remaining hosts, but capacity was down enough that they had to disable HA and DRS.

Upon interviewing the client, it became clear that they had already checked all the usual suspects. Nothing in the configuration prior to the power cycling had changed. Switch configurations, cables, ports, port groups, iSCSI settings, etc. were all exactly as before. In desperation, they had even wiped and re-installed the host using ESXi, carefully re-configuring everything to match the working hosts in the hopes that this would resolve the issue. It did not.

The Non-Standard Configuration

We know that VMware and many other experts recommend separating your vSphere network into separate Storage, Management, vMotion, and Production VM networks, typically using VLANs. This client, however, had opted to stay with a flat network configuration with all port groups and vmkernel interfaces configured on the same IP subnet. While this isn’t a Best Practice, there really isn’t anything wrong with doing things like this. As long as the vmknics can talk to the SAN, all should work fine, right?

At some point in the past, however, the decision was made to place an air gap between the storage interfaces and the rest of the network. All of the storage-related physical interfaces were connected to a switch which was not uplinked to the rest of the network in an effort to isolate that traffic so it wouldn’t overload the Production VM and Management traffic. Again, this isn’t a Best Practice, but it should work (and it did for quite some time) configured this way.

Troubleshooting

Where to start? I first plugged my laptop into the storage switch and attempted to ping the IP addresses assigned to the iSCSI vmkernel ports on the troubled host. No pings were returned, yet I was able to successfully ping all other storage interfaces present on the switch. Also, as expected, I was unable to ping all the interfaces connected to the Production/Management switches — a quick check to make sure there wasn’t an uplink between them. This pretty much established what we already knew, but more importantly, laid the ground work for my next test.

Next, I used PuTTY to ssh in to the troubled host and perform vmkpings. Here, I noticed a pattern that led me to my conclusion. I was not able to ping the iSCSI interfaces of the SAN, but when I tried to ping IPs that I knew were only on the Production/Management switches, the pings were returned. This made it clear that the Storage network traffic for the troubled host was exiting the host via the physical interfaces connected to the Management/Production switches and not via the interfaces on the Storage switch.

So what was happening? Upon booting up, that host was binding its iSCSI software initiator to the Management vmkernel port and not the vmkernel ports uplinked to the Storage switch. Since all vmkernel ports are automatically enabled for iSCSI traffic and there is no way to disable iSCSI traffic on a vmkernel port, there was no way to force the iSCSI software initiator to bind to a particular vmkernel port — except to do things right and set them up on separate IP subnets/VLANs.

The Real Solution and The Work-Around

So, of course, the real solution is to re-work the storage network so that it uses a different IP subnet than the production network. This, however, requires planned down time to re-IP all the storage interfaces on all hosts and the SAN. Until that can be planned, they were still down a host and running without HA/DRS. On a hunch, I came up with the following work-around, which got the host back up and running until such time as the reconfiguration could take place:

  1. Power down the troubled host.
  2. Disconnect the network cables serving as uplinks for the Management vmkernel port.
  3. Power up the host, leaving those cables disconnected.
  4. Wait long enough to assure the host had completely booted into ESXi.
  5. Plug the Management vmkernel uplink ports back in.

This worked because the only vmkernel interfaces available while the server was booting were the ones connected to active uplinks — the ones connected to the Storage switch. Once that binding took place, it would not change so it was then safe to plug the Management vmkernel uplinks back in. Obviously not an ideal situation, but it did get the host back in service until a outage window can be scheduled to properly configure the Storage network interfaces.
VMware Knowledge base article 1004700 describes the advanced setting to add to your HA setup to disable the warning, “Host {xxx} currently has no management network redundancy.” This is helpful for situations where you do not necessarily need IP redundancy for your management network but do want to hide this warning so that it doesn’t mask any other warnings during production use. The article also describes what is required if you want to configure management network redundancy.

Overview

When a virtual machine (VM) is shut down, part of that process is the deletion of its .vswp or virtual machine swap file. If, however, the host on which the VM is running crashes, the .vswp file may not get removed. When the VM powers back up, it will create a new .vswp file and leave the old one in place. If there are several host crashes, this can start to eat up datastore space, robbing your VMs of space for snapshots or causing issues if you’ve over-allocated your storage.

Procedure

First off, a warning. If you delete the active .vswp file I don’t know what will happen, but I’m sure it will be Very Bad Indeed. Therefore, the most important part of this procedure is to identify the newest or youngest .vswp file created. This should be the one with the latest time stamp on it.

Another way to guarantee you identify the correct .vswp file is to shutdown the virtual machine properly. This will remove the active .vswp file, leaving behind only the extra ones you no longer need. To minimize confusion, make sure there are no snapshots of the VM prior to shutting it down.

Once you’ve identified the active .vswp file or shut the VM down to remove it, you can then use the vCenter client to browse your VM’s datastore and remove the extra .vswp file or files.

Overview

I don’t have all of the numbers memorized, but here’s what I remember off the top of my head:

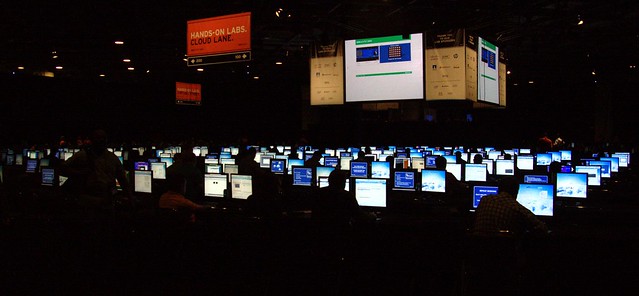
  • They had about 400 lab stations available, each with a WYSE thin client and two monitors.
  • Everything was “in the cloud” running from data centers across the country, none of them local.
  • Each lab’s VMs were created and destroyed on demand.
  • One monitor had the virtual environment and the other had your PDF lab guide.
  • Over the course of the conference they created/destroyed nearly 20,000 VMs.

Some Problems

I had to re-take a couple of labs due to some slowness issues. These appeared to be due to some storage latency when certain combinations of labs were turned up at the same time. I overheard some of the lab guides asking people to move to a different workstation when they complained of slowness. They explained that, by moving to a different station you would be logging in to a different cluster of servers, which would possibly help speed you up. I opted to come back later and re-take the two troubled labs. I was only able to get in 8 lab sessions as a result. I could have potentially completed 10 or 11.

Most of the time the lab VMs were very responsive and I was able to complete them with plenty of time to spare. The default time alloted was 90 minutes, but they would adjust that down to as low as 60 minutes if there was a long line in the waiting area. Prior to one lab session, I had to wait in the “Pit Stop” area before my session. Here’s a photo I snapped while waiting:

IMG_3174

List of Labs I Took

Here’s the list of labs I sat through:

  • Troubleshooting vSphere
  • Performance Tuning
  • ESXi Remote Management Utilities
  • Site Recovery Manager Basic Install & Config
  • Site Recovery Manager Extended Config & Troubleshooting
  • Vmware vCenter Data Recovery
  • VMware vSphere PowerCLI
  • Vmware vShield

Overall Impression

My overall impression of the lab environment was positive. Despite a few performance issues, I think they did an excellent job of presenting a very large volume of labs. I certainly learned a lot while sitting the labs and look forward to taking more next year. I’m sure the labs team gathered a lot of data which will help them improve the lab performance for next year as well.

Large Scale Geek Assault

Moscone Center wasn’t big enough for the whole conference this year. With a record 17,000+ attendees, the halls were crowded and the lines to sessions were quite long — especially the first couple of days. I think a larger venue is in order for years to come. Not sure where they can go, though.

I was unable to get in to a couple of sessions the first day, but managed to fill in some of that time with work in the labs (more no those later). Overall, though, I was able to cram in enough sessions to make it well worth the trip. My main problem was trying to narrow down my focus. This year, I tried to stick to sessions dealing with Troubleshooting and Best Practices.

In all, I took notes in 13 sessions and sat through 8 lab sessions. Not bad for a New-V?

Notes and Power Outlets

I made a good call and picked up a small netbook computer to take with me in lieu of my larger T61 ThinkPad. The longer battery life on the netbook (more info on it later) allowed me to skip the power outlets when racing to my next session. Still, I tried to conserve power by putting it into sleep or hibernate as much as possible during and between sessions. I uploaded my notes to my Dropbox account so I would have a backup.

Why was this a good call? Because there were a lot of people there with larger laptops suckling power from the outlets wherever they could be found. On the third day of the conference I found a small room on the second floor of Moscone West with a sign in front stating “VCP Lounge.” Assuming I would have to prove I held a VCP certification, I quickly pulled up my transcript on my Droid, then walked in. Turns out no one was checking, so I sat down, plugged in and caught up on some work e-mail whcih had accumulated over the first part of the week.

Food

The food provided at the conference was hit or miss. The breakfast area in Moscone West was huge and never seemed full when I was there (maybe it got busy later in the day?). They had croissants, muffins, danishes, bagels, fresh fruit, coffee and juices — everything you needed to fuel up for a morning of work in the lab which was in the same building.

I had a couple of cold boxed lunches. One was called Mediterranean Salad, which consisted of a main dish of mixed greens, veggies and a vinaigrette dressing, an apple and a sort of fruit brownie. I grabbed that box, headed over to the Yerba Buena Gardens to eat outdoors and escape the crowds. The other cold lunch was in a similar box also with a brownie bar, fruit and a sandwich. The only hot lunch I had was not very good, so I avoided the hot lunches from that point on. It consisted of overcooked fried chicken, cole slaw and a biscuit. Next year, I’ll stick to the cold lunches.

One day, I decided to escape the conference food and had a bowl of Seafood Udon at Shiki Japanese Restaurant which is across Third Street from the Moscone South building.

More to Come?

What have I missed in this first article? In the coming days I’m going to write up some articles with more detail on the following:

  • My impressions of the lab environment.
  • My netbook setup for the conference.
  • List of labs I took and any significant notable items.
  • List of sessions I attended and some of my notes from each.

First off, my hat goes off to both Sean Clark and Theron Conrey for organizing an excellent gathering which mixed geeks, beer and munchies at the Thirsty Bear. I got to rub elbows with Scott Lowe, author of Mastering VMware vSphere 4, which was instrumental in my obtaining my VCP 4 certification this year. I resisted the urge to ask for a photo, but I did manage to get his business card.

Anyway, I think Theron and Sean will need a bigger venue next year. The place was packed with people, but just to capacity. I’m sure interest in this event will grow for next year so I hope they can find a suitable location. Maybe get a few kegs from the Thirsty Bear to keep the tradition going?

Hopefully I can make it again next year. I need to get better at introducing myself to people and socializing. Guess I’m just your average introverted Geek, but I’m working on it!

Here’s a quick tip on how to create a bootable USB flash drive from which you can install ESXi.

  1. Download UNetbootin (available for Windows and Linux).
  2. Download the latest ESXi .iso file from VMware.
  3. Format your USB flash drive (1 to 2 GB should work, I used a 4 GB one) with a FAT32 file system.
  4. Fire up UNetbootin and select the option to use your own .iso file.
  5. Make sure you choose the RIGHT USB flash drive — Best Practice would be to have only your target drive connected while doing this!
  6. Click OK and let it cook. This may take a few minutes.
  7. Cancel the prompt at the end to reboot — you don’t want to reboot, really.
  8. Unmount your USB flash drive and test it on ESXi compatible hardware!

There are some limitations to this method:

  • Target system must support USB boot (very few don’t)
  • Won’t work with an EFI BIOS unless that BIOS supports booting a legacy mode BIOS. Even then, it still may not work.

And, yes, you can do this with the regular ESX .iso file, but you’ll need to purchase licensing for those installs eventually. You can register ESXi for free use!