I think I’ve picked an excellent photographer to open this Category on my blog: Mr. Flibble. Irreverent, wacky and whimsical, yet at the same time cerebral and engaging. I couldn’t help but browse his entire photostream — Yes, every single photo entered my irises and tickled my visual cortex.
At the risk of driving you away from my own blog, I’ll lead with some important links to his work.
Now on to my critique. First one, so it may be a bit rough. Please endure!
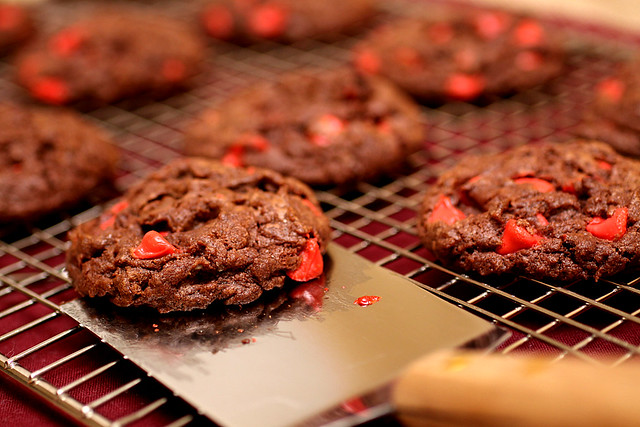
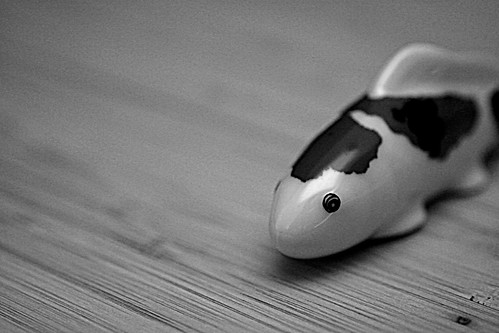
I think the best way to critique this particular photographer will be to select a spectrum of his work. While he may be gaining notoriety for his recent distorted, ‘shopped and humorous creations, I feel it is important to dig a little deeper and reveal the underlying talent and evolution which is evident by browsing further back in his photostream. To start, the photo that sucked me in:
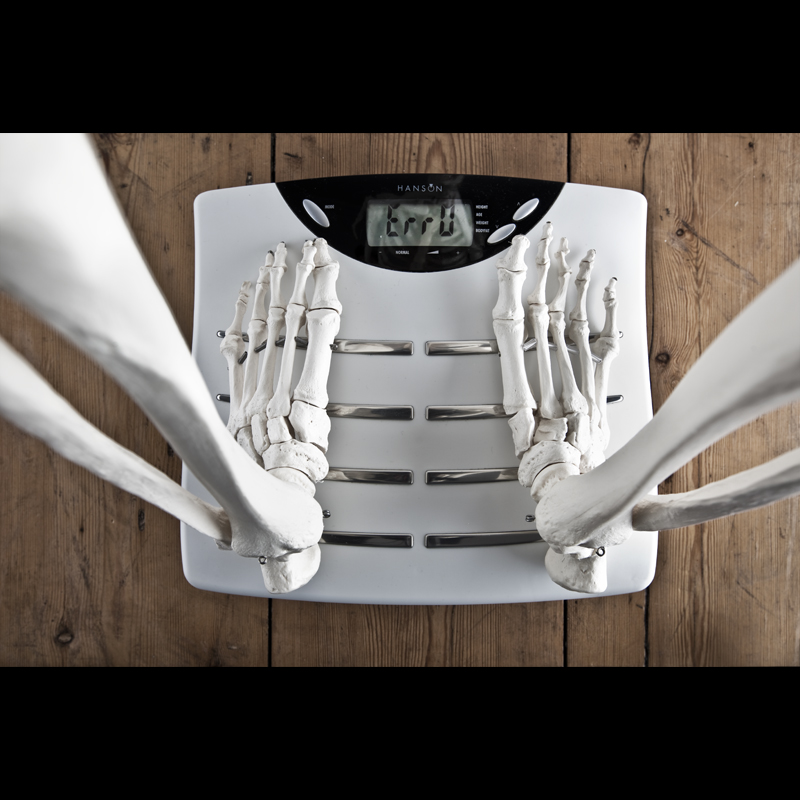
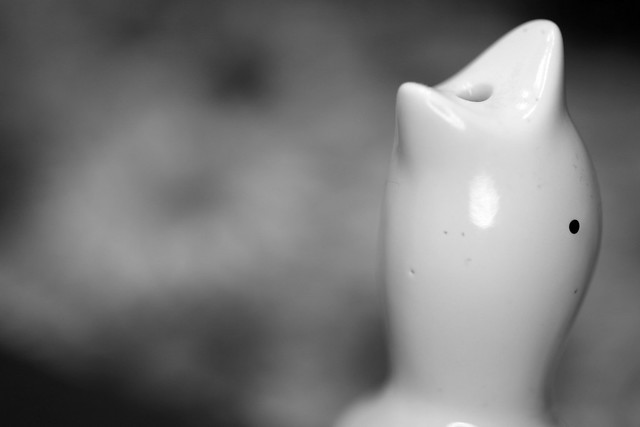
New sulphuric acid diet was maybe too drastic
But wait, there’s more. This photo grabs your attention and the caption is hilarious, but Mr. Flibble is not done with you yet. The description of this photo on Flickr continues to entertain:
Not all of us are given free rein to lunge, stretch and perspire over ever part of the asylum. And as such, even the normally enthusiastic Flibble is prone to the odd love handle.
Not odd in that away, you understand. I hear it’s perfectly normal for love handles to protrude 45 inches outwards towards the ears before circling back towards the pelvis.
Anyway… a diet was in order and this one seemed so easy: “Just take half a litre of sulphuric acid with each meal and snack, and see the weight fall off you” they claimed.
Perfect.
Not being one to disobey unfounded claims, I embraced this diet with much gusto – even snacking between snacks just to be able to imbibe more of this magical “acid” they talked of.
Weighed myself today.
Something may have gone wrong.
Even the scales seem to suggest this might not have been my most splendid of ideas…
*sobs*
I’m on Twitter: @IDrinkLeadPaint
Strobist:
Softbox camera left at floor-level on 2.0, Second softbox camera right at floor-level, stupidly set on 2.5. Triggered by cable.
Yeah, so when he’s done melting your brain with sulfuric acid, he goes on to give you some juicy, technical details of how he achieved this wonder by providing strobist info. How cool is that? Super Cool, my friend.
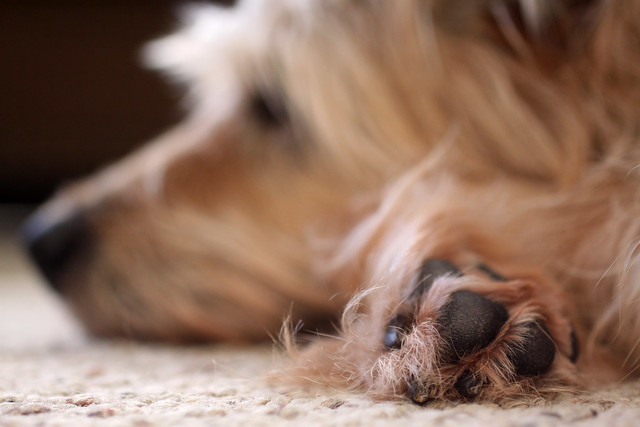
The photo and caption grabbed me, the narrative in the description drew me in, and the details kept me coming back for more. That wood floor as a backdrop. Rough-hewn, wide hardwood. The perspective, although head-on and dead center on the scale itself, draws your eyes down the tibiae toward the center. Even the reflection of the skeletal ribcage in the LCD display on the scale and the skeletal nature of the metal “ribs” on the surface of the scale (why are those there? Perhaps a BMI feature of this scale?) work to increase the interestingness of this image.
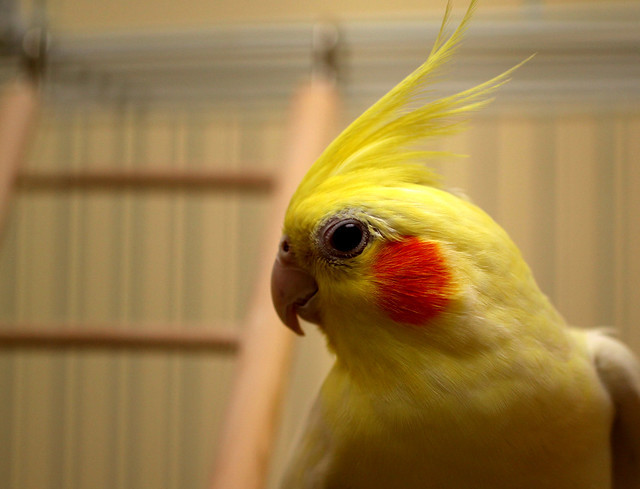
Now, on to another absurdity which grabbed my attention.
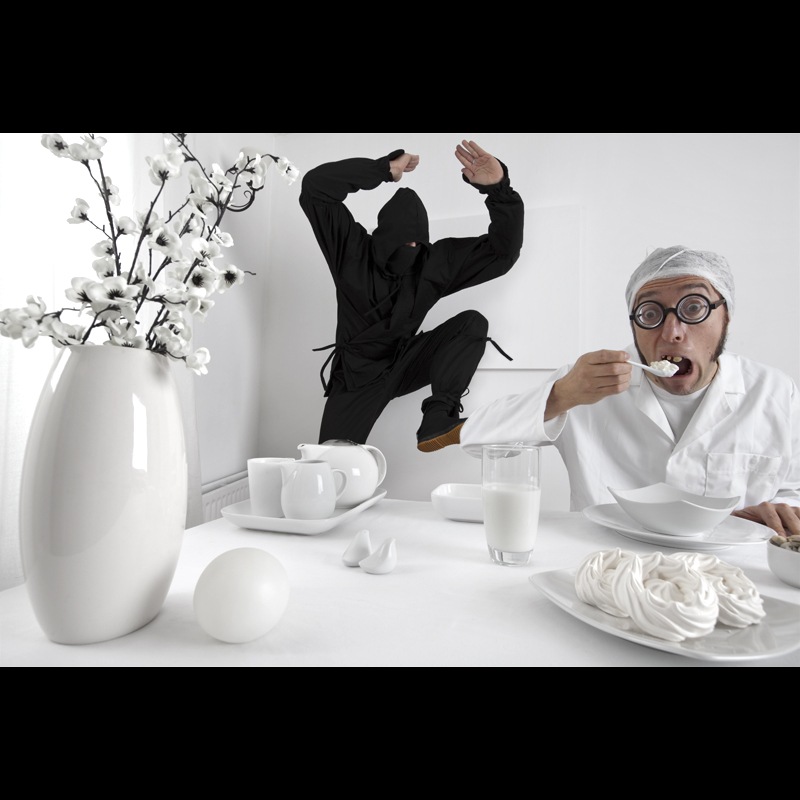
Advanced ninjaing
While I much prefer Samurai to Ninjas, I couldn’t help but chuckle at this one upon first sight. But, again, Mr. Flibble delivers much more than expected. His description starts:
Dr. White was such a quiet, neat and polite man and seemed the most unlikely person to provoke the wrath of the asylum’s trainee ninja department, but he did, and today he paid the ultimate price.
It goes on. Please click the image above to continue reading. I’ll wait here should you decide to return.
Ahh, thank you for returning! Black, white, grey and Ninjas? What more could you ask for, but Mr. Flibble delivers it all. I love the setup here. There is so much detail, you can keep coming back to find something new. The textures of Dr. White’s lab coat and the “poofs” on the plate in front of him. The contrast of the deep blacks — not only in the ninja’s uniform, but also of Dr. White’s glasses frames and the stems of the flowers in the vase. One could almost remove the Ninja and Dr. White and still have a stunning photograph.
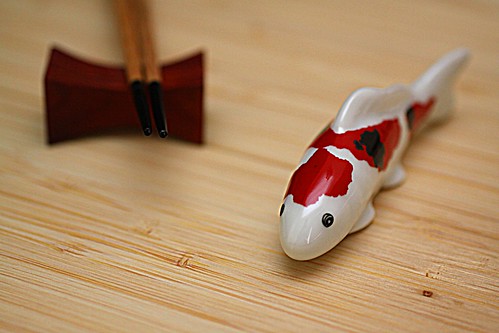
And now on to some alternative samples from Mr. Flibble’s work which show the underlying talent, absent the absurd, but still retaining the whimsy and vision that pulled me in so much that I did view his entire photostream.

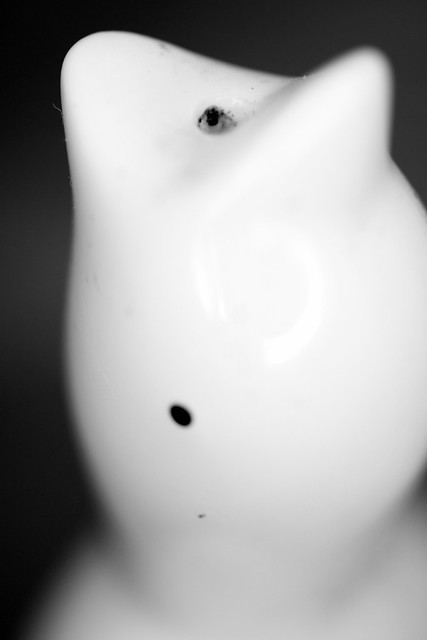
Gremlin or Mogwai?
Everything about this photo works:
- Shallow depth of field with well-chosen point of focus
- Black backdrop and foreground
- Inverted subject
- Cute!
Yet it still retains the essence of whimsy without the patent absurdity of his later photos. I’ve started following Mr. Flibble’s RSS feed on Flickr in hopes of seeing more photos like this in the future — albeit intermixed with the funny and absurd.
Next up, the abstract.
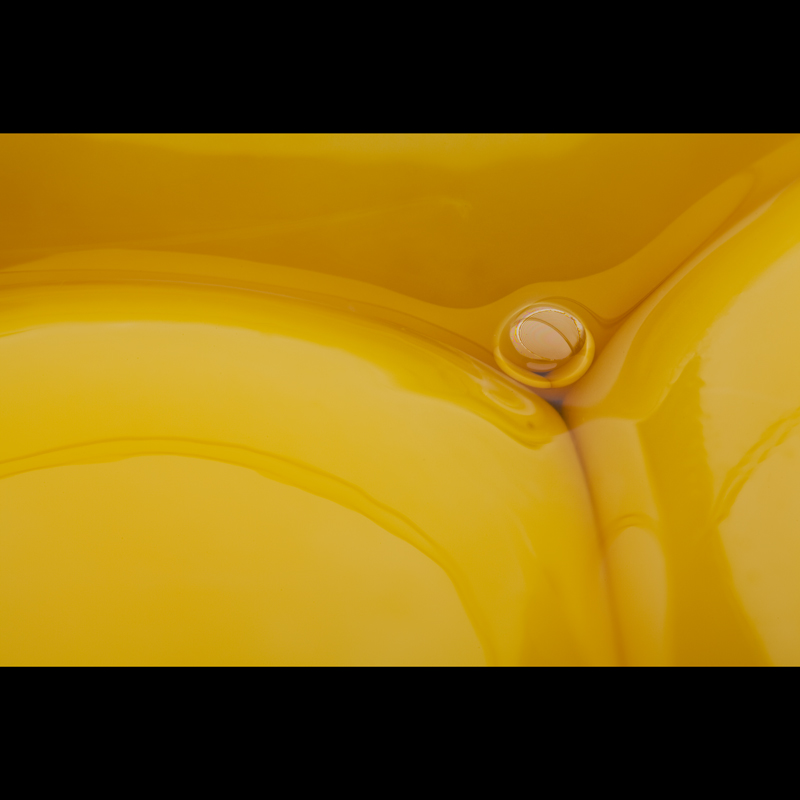
Yolk folk
From the brief description on Flickr, you get the impression that he considers this a “throw away” shot, but I feel it shows he has photographic vision. While hunting for subjects to fulfill his 315/365 Project, he managed to find this gem amongst the routine of his life. The lines, the color, the bubble and the lighting all converge slightly off-center for a wonderful composition.
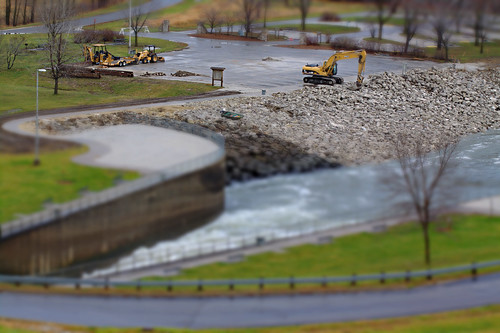
What does a good photographer do when faced with a subject that has been captured so many times over and over? Change the perspective!
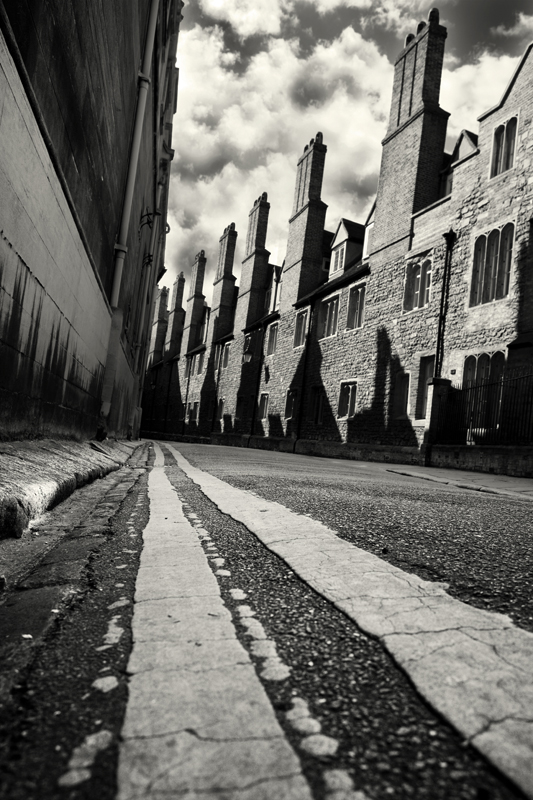
In the gutter of Cambridge
A Google search of “Trinity Lane Cambridge” turns up several photos, but none of them as interesting as this. The forced perspective makes the buildings shrink into the background, looking more like cut-outs than stone and mortar. Texture, form, shadow and light mix perfectly here. I find myself discovering new details with each view — a true sign of photographic genius.
Finally, a bit of social consciousness.
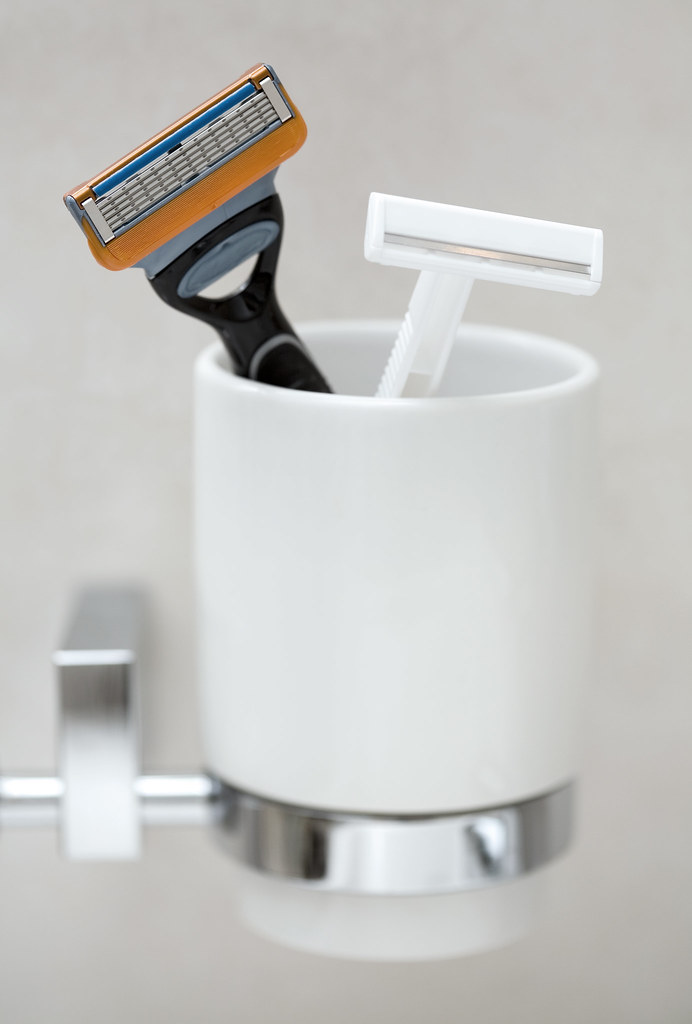
Feature creep
Juxtaposition, contrast, depth of field and social consciousness all in one? Yup. And all accompanied by a bit of poetry:
The endless pursuit:
More blades
More plastic
Batteries
More colour
More marketing spin
More money
More landfill
More complicated
More compulsion to upgrade
More more.
Where will it ever end?
Unfortunately, I think the answer to Mr. Fibble’s question is yes. Yes, it will come to an end, but not before it hyper-extends into the beyond!