Virualization

Found myself in a predicament just the other day. I had spent several hours building out template VMs for a few servers, installing vmtools, applying all the latest updates, running sysprep, etc. At the end of that effort, I exported them to .ova files and removed the original VMs. Then I decided I might want to test these .ova exports to make sure they work. Well, guess what? I found myself with broken .ova files that would not import.

The error message, “OVF Deployment Failed: File ds:///vmfs/volumes/uuid/_deviceImage-0.iso was not found” led me to VMware KB article 2034422. The resolution, of course, required use of the original source VMs which I had over zealously deleted earlier. Thankfully, the article gave enough detail about the issue that I was able to work up the following little hack to repair my damaged .ova files:

  1. I extracted the contents of the .ova files using tar. This works because .ova files are just uncompressed tar archives. You could also use 7zip on Windows.
  2. Inside, there was one .mf or manifest file, one .ovf file, and one .vmdk. There would be more .vmdk files if I had more drives associated with the VMs.
  3. I edited the .ovf file to change the text “vmware.cdrom.iso” to “vmware.cdrom.remotepassthrough”. The reason for the failure was that the import process was trying to mount a non-existent vmware tools iso image.
  4. Once edited, the SHA1 sum of the .ovf file had changed, causing it to not match the sum contained in the manifest. I generated a new SHA1 sum and replaced the original in the .mf manifest file.
  5. Finally, I re-archived the files with tar, making sure to change the extension on the end back to .ova. The tricky bit to this is to make sure you add the files to the archive in the correct order. The .ovf has to be the first file in the archive. Use tar cvf archive.ova vm.ovf to create, then tar uvf archive.ova *.mv *.vmdk to append the rest of the files. Note that I couldn’t get 7zip to archive these in order. I had to use GNU tar from an Ubuntu VM.

I was then able to successfully import the .ova files back into my vSphere environment.

Update #3: I’ve had zero time to work on my photos. Had a family emergency over the Labor Day Weekend (not fun calling 911 on Saturday). Photos coming soon, I promise! Please check back.

Here’s a teaser photo from the VMworld 2012 Party last night. There will be many more photos to come, so please check back!

Has the smart phone supplanted the Zippo? Empirical evidence provided.

Here’s the Ghandi statue in the Ferry Building parking lot:


The Setup

The VMware View 5.1 Installation Guide recommends replacing the default self-signed SSL certificates on all servers (Connection, Security, and Composer) with a certificate signed by a Certificate Authority (CA). For the externally-facing Security server role, you should purchase a signed cert from an established CA provider. For your internal Connection and Composer servers, however, it makes more sense to deploy an internal CA.

The other day, myself and a co-worker ran into a situation where we had configured Microsoft’s CA server on a Windows Server 2008 Enterprise server, but were having issues getting the Connection servers to connect to it and generate a certificate request (CSR). After spending too much time trying to get past the RPC error, I decided to by-pass that process by using openssl on an ancient MacBook Pro to generate the CSR.

The following is an account of the process I used, noting some of the pitfalls that hung me up along the way and providing references to Web sites which were helpful.

The Procedure

  1. Generate the CSR on the Mac:
    1. Generate an RSA key by issuing: openssl genrsa -aes128 -out server1.key 2048
    2. Generate the CSR using that key: openssl req -new -key server1.key -out server1.csr
    3. Answer the questions during the CSR generation, making sure to enter the FQDN of the connection server in the Common Name field.
  2. Sign the CSR using the Microsoft CA’s Web interface:
    1. Connect to http://<CA Server fqdn>/certsrv
    2. Select “Request a certificate”
    3. Select “advanced certificate request”
    4. Select “Submit a certificate request using a base-64-encoded CMC. . .”
    5. The next form will allow you to copy and past the text of the server1.csr file into it.
    6. You can use the Web Server Certificate Template, or create a custom template earlier on the CA.
    7. Click Submit.
    8. Download the Base 64 encoded certificate (don’t need the whole chain).
  3. Generate a .pfx file on the Mac:
    1. Combine the .csr and .crt files into a .pfx: openssl pkcs12 -export -in server1.crg -inkey server1.key -name vdm -passout pass:<password> -out server1.pfx
    2. The key here is the ‘-name vdm‘ option which sets the friendly name so that View will use this certificate.
  4. Install the .pfx file on the View Connection server:
    1. Transfer the .pfx file from the Mac to the View Connection server. smbclient on the Mac works well for this.
    2. Open the Certificates (Local Computer) -> Personal -> Certificates snap-in in the mmc.
    3. Import the .pfx certificate. It will prompt you for the password you gave during generation of the .pfx.
    4. Make sure to check “Mark this key as exportable. . .”
    5. Also, make sure the internal Microsoft CA server is imported as a Trusted Root Certification Authority.
    6. If the self-signed certificate with the Friendly name of vdm is still present, change its Friendly name to something else so that the View server only sees one cert with this Friendly name.
  5. Reboot the View Connection server. If you just restart the services, the new certificates may not get picked up by View. I’ve had better success simply rebooting.

The Pitfalls

Here are some of the ways I messed up along the way, causing myself more grief than was necessary:

  1. Spent too much time troubleshooting the RPC issue. While using the CA server Web interface would have made generating the .csr file easier, it wasn’t that much more difficult to create the .csr on my Mac. I still need to fix the RPC issue, but this work-around helped to make progress.
  2. At first, I skipped the encapsulation of the signed certificate and the private key into a .pfx. After reviewing some of the other blogs which step through this process, I realized I was missing the prompt during import for the private key password.
  3. Perhaps I was just impatient, but simply re-starting the VMwareVDMDS service didn’t result in a recognized, valid certificate. Rebooting the View server resulted in the certificate being recognized as soon as the services came up.

The References

  1. Start with this site, as it gives a very good step-by-step process.
  2. This site shows the steps to generate the CSR using openssl for Windows. The commands don’t translate to a Mac, but the rest of the steps are spot on. The openssl commands for generating the .pfx file, however, do work on the Mac version of openssl.
  3. This site has the proper options for generating the CSR on a Mac with openssl. Note that I used -aes128 instead.
  4. VMware View 5.1 documentation on generating the certificates was also helpful in steering me in the right direction.

The Setup

A client called in with an interesting problem. They had recently performed a planned outage due to a power issue at their premises, but upon powering everything back up one of their hosts was unable to access the iSCSI SAN volumes. Fortunately, they were able to bring up all of the VMs on the remaining hosts, but capacity was down enough that they had to disable HA and DRS.

Upon interviewing the client, it became clear that they had already checked all the usual suspects. Nothing in the configuration prior to the power cycling had changed. Switch configurations, cables, ports, port groups, iSCSI settings, etc. were all exactly as before. In desperation, they had even wiped and re-installed the host using ESXi, carefully re-configuring everything to match the working hosts in the hopes that this would resolve the issue. It did not.

The Non-Standard Configuration

We know that VMware and many other experts recommend separating your vSphere network into separate Storage, Management, vMotion, and Production VM networks, typically using VLANs. This client, however, had opted to stay with a flat network configuration with all port groups and vmkernel interfaces configured on the same IP subnet. While this isn’t a Best Practice, there really isn’t anything wrong with doing things like this. As long as the vmknics can talk to the SAN, all should work fine, right?

At some point in the past, however, the decision was made to place an air gap between the storage interfaces and the rest of the network. All of the storage-related physical interfaces were connected to a switch which was not uplinked to the rest of the network in an effort to isolate that traffic so it wouldn’t overload the Production VM and Management traffic. Again, this isn’t a Best Practice, but it should work (and it did for quite some time) configured this way.

Troubleshooting

Where to start? I first plugged my laptop into the storage switch and attempted to ping the IP addresses assigned to the iSCSI vmkernel ports on the troubled host. No pings were returned, yet I was able to successfully ping all other storage interfaces present on the switch. Also, as expected, I was unable to ping all the interfaces connected to the Production/Management switches — a quick check to make sure there wasn’t an uplink between them. This pretty much established what we already knew, but more importantly, laid the ground work for my next test.

Next, I used PuTTY to ssh in to the troubled host and perform vmkpings. Here, I noticed a pattern that led me to my conclusion. I was not able to ping the iSCSI interfaces of the SAN, but when I tried to ping IPs that I knew were only on the Production/Management switches, the pings were returned. This made it clear that the Storage network traffic for the troubled host was exiting the host via the physical interfaces connected to the Management/Production switches and not via the interfaces on the Storage switch.

So what was happening? Upon booting up, that host was binding its iSCSI software initiator to the Management vmkernel port and not the vmkernel ports uplinked to the Storage switch. Since all vmkernel ports are automatically enabled for iSCSI traffic and there is no way to disable iSCSI traffic on a vmkernel port, there was no way to force the iSCSI software initiator to bind to a particular vmkernel port — except to do things right and set them up on separate IP subnets/VLANs.

The Real Solution and The Work-Around

So, of course, the real solution is to re-work the storage network so that it uses a different IP subnet than the production network. This, however, requires planned down time to re-IP all the storage interfaces on all hosts and the SAN. Until that can be planned, they were still down a host and running without HA/DRS. On a hunch, I came up with the following work-around, which got the host back up and running until such time as the reconfiguration could take place:

  1. Power down the troubled host.
  2. Disconnect the network cables serving as uplinks for the Management vmkernel port.
  3. Power up the host, leaving those cables disconnected.
  4. Wait long enough to assure the host had completely booted into ESXi.
  5. Plug the Management vmkernel uplink ports back in.

This worked because the only vmkernel interfaces available while the server was booting were the ones connected to active uplinks — the ones connected to the Storage switch. Once that binding took place, it would not change so it was then safe to plug the Management vmkernel uplinks back in. Obviously not an ideal situation, but it did get the host back in service until a outage window can be scheduled to properly configure the Storage network interfaces.

Agenda:

  • 3PM: Check-in, Welcome, Facilities
  • 3:05: VMUG Video
  • 3:15: Fusion-io preso
  • 3:50: Break
  • 3:55 VMware vShield Security preso – Karl Fultz, VMware SE
  • 4:40: Open Discussion
  • 4:55: Drawings
  • 5:00: Break
  • 5:15: Social networking at Buffalo Wild Wings

My Notes:

  • VMUG Video
    • VMware Paul Strong, CTO, Global Customer and Field Initiatives, VMware
    • vCloud Community, 8 Certified providers
  • Fusion IO: Gus Siefker (sales) and Victor Backman (tech)
    • 4 years in business, 80,000 cards
    • Move a lot of data, fast
    • Hardware and software combo that does a minimum of 100k IOPS
    • Good for DBs, VDI density
    • VDI Design: abstracting the layers (HW, OS, App, User Data) helps prep for putting Fusion-IO in the mix.
    • Boot images and high-IOPS data go to FIO, User Data and low IOPS go to SAN storage, lower tiers.
    • Basically a block level device. Presents to host as local storage.
    • Storage is persistent, can be (if needed) moved to different servers. Gave example of one client that ships them off site rather than file transfer over Internet/WAN.
    • Nutanix Complete Block: 4 Fusion-io ioDrives = 1.3 TB fo storage.
    • Card draws about 25 W of power, but replaces lots of HD spindles.
    • Uses NAND Flash memory like an SSD, but removes the controller from the mix.
    • 15 micro second latency.
    • ioTurbine: recently acquired by Fusion-io. Allows vMotion of local storage on a Fusion-io card which normally couldn’t be vMotioned.
    • There is an ioTurbine guest driver installed on the VMs. Acts as a read cache. Writes still go to SAN.
    • Keeping up to 80% of IO local to ESXi host, and reduces read load on back end storage.
    • Lab test with F-io card and NetApp back end storage using IOmeter as the load with 8 VMs. F-io solution averaged around 12,000 IOPS once the cache “warmed” up. NetApp read ops just about nothing, so its write ops performance increased.
    • When a VM is rebooted, its cache is flushed and it needs time to re-warm.
    • Guests supported are Windows only for now. Need a driver in the guest. Linux support is “coming soon.”
    • There is also a host driver.
  • Refreshment Break
  • vShield Security Overview: Karl Fultz, VMware SE
    • Enterprise Security today is not virtualized, not cloud ready.
    • Most people are still using physical security devices.
    • Moving workloads is challenging when the security doesn’t move with it.
    • vShield moves the firewall/security into virtual appliances on the host.
    • Perimiter, Internal, and End Point security.
    • vShield Zones/vShield App are basically the same. vShield Zones included with 4.1 Enterprise Plus. Segmentation and data scanning. vShield App new stand-alone product.
      • Provides 5-tuple ruleset firewall
      • Hypervisor-level fw. Inbound, outbound connection control at vNIC level
      • Groups that can stretch as VMs migrate to other hosts.
      • Flow monitoring, policy management, logging and auditing.
    • vShield Edge is perimiter security.
      • Provides NAT, DHCP, VPN, some load balancing.
      • VLAN /Port Group isolation. PG isolation requires vDS.
      • Detailed network flow stats.
      • Policy management and logging/auditing.
    • vShield Endpoint is AV offload.
      • Offloading scanning to the Security VM. No AV agents in the guest VMs.
      • Central management.
      • Enforce remediation within the VM with the driver.
      • Trend Micro (now), McAffee (in beta now), Sophos (coming soon), Symantec (coming soon) provide endpoint appliances.
      • Windows only for guests.
    • vShiled Manager is the management plugin in vCenter.
    • vShield App with Data Security had pre-defined templates to scan environment for data loss. (DLP, agentless if you don’t count VM Tools as an “agent”). Can configure trust zones.
    • Security policies follow VMs. Allows for mixed trust zones.
    • vShield Zones is not supported in vShield Manager 5.0, must use older verson of vShield Manager to support Zones. Will need multiple managers if mixing in 5.0 vShield App/Endpoint/Edge products.
  • Q/A Time
    • I asked for clarification about vShield Zones/App:
      • Enterprise Plus 5.0 still includes Zones. App is a separate add-on product, but they are almost identical. App adds a little more granularity.
      • Zones rules are stored in vCenter db, so backup of vCenter includes backup of the rules.
      • Upgrade path from Zones to App? First time anyone has asked him. Since the rules are in vCenter db it SHOULD just work.
  • Drawing for prizes

What Is It?

Iometer started life as a utility built by Intel to generate and measure i/o loads. It was released by them under the Intel Open Source License. The date this happened isn’t clear from their Web site, but the project was first registered on SourceForge in November 2001.

Get the Software

You can grab the latest stable release from the downloads page. Although the latest stable build is from 2006, I recommend using it rather than the newer, unstable versions available from the SourceForge project page (unless you like crashing your VMs, that is).

There are downloads for Linux, Netware, and Windows. All are 32-bit (i386) builds, but the source code is available.

Installation

I’ve not used the Linux version yet, so here is a walk-through of the installation (pretty much next, next, finish) on Windows 7:

  1. When you launch the installer, UAC will request admin rights (you aren’t running as an Admin, of course), then present you with the opening dialog:
  2. Click Next and the first of two license agreement prompts will then display:
  3. Click I Agree, then you can choose the components to install. I just chose the defaults:
  4. Click Next and you can then choose where to install it. Again, the default is just fine:
  5. Click Install, then Finish in the resulting dialog to complete the process:
  6. Now navigate to the Start menu and fire up Iometer. The second license agreement will show, but only the first time you launch. Agree to it to continue:
  7. Click I Agree to continue to the first screen. This is the point where I was confused at first, so pay attention. You need to select the system on the left, then click on the drive or drives to which you’d like to send IOPs. Then the important part is to fill in the Maximum Disk Size. If you don’t do this, then the first time you run a test, the program will attempt to fill the entire drive with its test file! Here’s a shot of what it should look like after you’ve selected to create a 1 GB (2048000 Sectors) test file:
  8. Next you should click on the Access Specifications to set up profile for the type of IOPs you’d like to generate. For a Windows system emulating fairly heavy I/O, I usually:
    1. Select “4K; 75% Read; 0% random” in the right column:
    2. Then click Edit Copy and bump up the randomness to 66%:
    3. Then click OK to yield the following:
  9. At this point, you can just click the green flag in the top button bar to start the test. You will be prompted to choose a location for the results.csv file. Just click OK unless you need to change it. I like to visit the Results Display tab first, though, and tweak the settings so I can watch the measurements:

Other Hints and Tips

Location and Size of the Test File

The test file (in our example 1 GB in size) is created either under the root of the drive selected, or under the user’s folder: C:Users%username%AppDataLocalVirtualStore. The name of the file is iobw.tst.

This file is only generated the first time you launch Iometer and is not generated again — even if you close, re-launch Iometer, and select a different Maximum Disk Size. Therefore, if you need to use a different size, you must do the following:

  1. Stop any tests and close Iometer.
  2. Locate and delete the existing iobw.tst file.
  3. Re-launch Iometer and select your new select your new Maximum Disk Size.
  4. Select any Access Specification you’d like, it doesn’t matter unless you want to run an actual test at this point.
  5. Click the Green flag (and save the results.csv location). The status bar at the bottom will show “Preparing Drives” until the iobw.tst file has been built, then the test will start.
  6. At this point you can stop the test and close Iometer. Your new iobw.tst file will be used every time.

I couldn’t find a way to reset the size of this file or remove it from within the Iometer GUI.

Simulating Different Workloads

If you want to throw more IOPs at your storage, you can add multiple worker processes under the main manager process. These workers can be clones of the first one you set up, or they can be new ones set up with different Access Specifications. All of them will run at the same time when you start the test.

A good write-up about Iometer and simulating various server workloads is available on the VMware Communities Forum. That post gives some example settings for simulating Exchange and SQL Server workloads with Iometer.

Conclusion

Iometer is a great utility to use in your Test/Dev environment to simulate workloads. You could also use it to stress test a pre-production environment to make sure you haven’t mis-configured anything, or accidentally created any bottlenecks in your design.

VMware Knowledge base article 1004700 describes the advanced setting to add to your HA setup to disable the warning, “Host {xxx} currently has no management network redundancy.” This is helpful for situations where you do not necessarily need IP redundancy for your management network but do want to hide this warning so that it doesn’t mask any other warnings during production use. The article also describes what is required if you want to configure management network redundancy.

Overview

When a virtual machine (VM) is shut down, part of that process is the deletion of its .vswp or virtual machine swap file. If, however, the host on which the VM is running crashes, the .vswp file may not get removed. When the VM powers back up, it will create a new .vswp file and leave the old one in place. If there are several host crashes, this can start to eat up datastore space, robbing your VMs of space for snapshots or causing issues if you’ve over-allocated your storage.

Procedure

First off, a warning. If you delete the active .vswp file I don’t know what will happen, but I’m sure it will be Very Bad Indeed. Therefore, the most important part of this procedure is to identify the newest or youngest .vswp file created. This should be the one with the latest time stamp on it.

Another way to guarantee you identify the correct .vswp file is to shutdown the virtual machine properly. This will remove the active .vswp file, leaving behind only the extra ones you no longer need. To minimize confusion, make sure there are no snapshots of the VM prior to shutting it down.

Once you’ve identified the active .vswp file or shut the VM down to remove it, you can then use the vCenter client to browse your VM’s datastore and remove the extra .vswp file or files.

Overview

I don’t have all of the numbers memorized, but here’s what I remember off the top of my head:

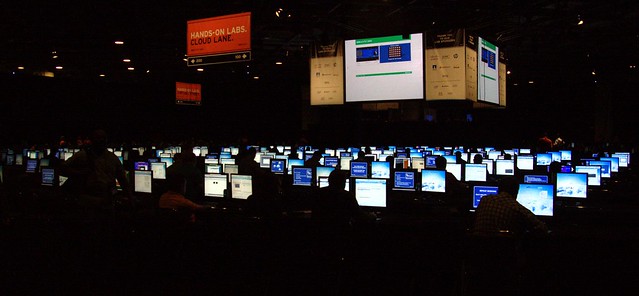
  • They had about 400 lab stations available, each with a WYSE thin client and two monitors.
  • Everything was “in the cloud” running from data centers across the country, none of them local.
  • Each lab’s VMs were created and destroyed on demand.
  • One monitor had the virtual environment and the other had your PDF lab guide.
  • Over the course of the conference they created/destroyed nearly 20,000 VMs.

Some Problems

I had to re-take a couple of labs due to some slowness issues. These appeared to be due to some storage latency when certain combinations of labs were turned up at the same time. I overheard some of the lab guides asking people to move to a different workstation when they complained of slowness. They explained that, by moving to a different station you would be logging in to a different cluster of servers, which would possibly help speed you up. I opted to come back later and re-take the two troubled labs. I was only able to get in 8 lab sessions as a result. I could have potentially completed 10 or 11.

Most of the time the lab VMs were very responsive and I was able to complete them with plenty of time to spare. The default time alloted was 90 minutes, but they would adjust that down to as low as 60 minutes if there was a long line in the waiting area. Prior to one lab session, I had to wait in the “Pit Stop” area before my session. Here’s a photo I snapped while waiting:

IMG_3174

List of Labs I Took

Here’s the list of labs I sat through:

  • Troubleshooting vSphere
  • Performance Tuning
  • ESXi Remote Management Utilities
  • Site Recovery Manager Basic Install & Config
  • Site Recovery Manager Extended Config & Troubleshooting
  • Vmware vCenter Data Recovery
  • VMware vSphere PowerCLI
  • Vmware vShield

Overall Impression

My overall impression of the lab environment was positive. Despite a few performance issues, I think they did an excellent job of presenting a very large volume of labs. I certainly learned a lot while sitting the labs and look forward to taking more next year. I’m sure the labs team gathered a lot of data which will help them improve the lab performance for next year as well.

First off, my hat goes off to both Sean Clark and Theron Conrey for organizing an excellent gathering which mixed geeks, beer and munchies at the Thirsty Bear. I got to rub elbows with Scott Lowe, author of Mastering VMware vSphere 4, which was instrumental in my obtaining my VCP 4 certification this year. I resisted the urge to ask for a photo, but I did manage to get his business card.

Anyway, I think Theron and Sean will need a bigger venue next year. The place was packed with people, but just to capacity. I’m sure interest in this event will grow for next year so I hope they can find a suitable location. Maybe get a few kegs from the Thirsty Bear to keep the tradition going?

Hopefully I can make it again next year. I need to get better at introducing myself to people and socializing. Guess I’m just your average introverted Geek, but I’m working on it!