Technology

The Setup

I recently purchased three albums from iTunes. After downloading them, syncing them to my iPod, and listening through them I was happy. While driving the next day, I thought I’d shuffle through the playlist I had created with the new tracks. I quickly discovered that all the tracks on one of the albums had a flaw that was only evident when shuffling them. Tracks 2 through 17 were missing the first 2 seconds, and tracks 1 through 16 had the first 2 seconds of the following track tacked on to the end. This is easy enough to fix in Audacity, but I felt it important to report to iTunes, if only to call their attention to the issue so they could fix it before too many others reported it.

Requesting Support

After surfing through the apple.com site for a bit, I finally landed on their Express Lane Support page. I had to dig around a bit more before I found “Quality of purchased content” under “Purchases, Billing & Redemption.” I filled in the information required and opened a case describing the issue. An automated message stating my support request would be responded to within 24 hours came back very quickly.

Initial Response

The “real live person” response came back within 4 hours of posting the complaint. Impressive, since I posted my complaint at about 12:20 AM. The responding service representative apologized and gave detailed instructions on how to delete and re-download the content. I as pretty sure this would not resolve the issue (it wasn’t a corrupt download, as they seemed to think), but I went through the motions anyway. Upon listening to the re-downloaded content, I confirmed that the issue was not resolved and replied to the service representative, advising them that I believed the source files on their servers were not correct.

The Final Response

Hello Kenneth,

X here again from the iTunes Store Support. I am very sorry about my delay in responding to you. I have been away from the office for the last 2 days. I understand the album is still incorrect. When it comes to your money, I can certainly appreciate how important it is to feel that you are treated fairly, and I would be more than happy to help you out with this today.

I’m sorry to learn that this item did not meet the standard of quality you have come to expect from the iTunes Store. I have submitted this item for investigation. Apple takes the quality of the items offered on the iTunes Store seriously and will investigate the issue with this item, but I can’t say when or if the issue will be resolved.

In five to seven business days, a credit of $9.99 should be posted to your card that appears on the receipt for that purchase.

Kenneth, I want to thank you for choosing the iTunes Store and for being such a big part of the iTunes family.

Thank you for contacting iTunes Store Customer Support. Have a great day.

Fix It Yourself

Given that response, I had no choice but to spend some time in Audacity repairing the tracks. The general procedure was as follows:

  1. Open the first track in Audacity. This imports it to a native format used by Audacity for manipulation.
  2. Jump to the end and copy the bit at the end which belongs to the following track.
  3. Open the second track in Audacity and paste the first two seconds into their rightful place
  4. Zoom in on the pasted part and remove the slight pause introduced by the copy/paste operation. I progressively zoomed in and removed large blank spaces until I was zoomed as far as I could, then I matched up the two ends, deleting the last bit of silence.
  5. Listen to the second track to make sure it was a seamless paste (and the right song).
  6. Go back to the first track and delete the tail end. Export that track to .mp3 and .m4a (AAC) formats. Close that track.
  7. The open second track becomes your “first track”, and the “second track” becomes the following track. Start again at step 2 above.

After all the tracks were repaired (I worked on a copy from out of iTunes), I deleted the originals from iTunes and re-imported the repaired versions. I then had to go through and repair the tagging, as it was a bit messed up. For some reason, the tagging didn’t import consistently from the Apple versions (either that or it was inconsistent to begin with).

I wonder how many free copies of this album they’ll give out before they correct the files on their server? I wonder how many people will complain and get a refund vs. the number who will just put up with the issue? I wonder how many other albums are messed up on this way?

What Is It?

Iometer started life as a utility built by Intel to generate and measure i/o loads. It was released by them under the Intel Open Source License. The date this happened isn’t clear from their Web site, but the project was first registered on SourceForge in November 2001.

Get the Software

You can grab the latest stable release from the downloads page. Although the latest stable build is from 2006, I recommend using it rather than the newer, unstable versions available from the SourceForge project page (unless you like crashing your VMs, that is).

There are downloads for Linux, Netware, and Windows. All are 32-bit (i386) builds, but the source code is available.

Installation

I’ve not used the Linux version yet, so here is a walk-through of the installation (pretty much next, next, finish) on Windows 7:

  1. When you launch the installer, UAC will request admin rights (you aren’t running as an Admin, of course), then present you with the opening dialog:
  2. Click Next and the first of two license agreement prompts will then display:
  3. Click I Agree, then you can choose the components to install. I just chose the defaults:
  4. Click Next and you can then choose where to install it. Again, the default is just fine:
  5. Click Install, then Finish in the resulting dialog to complete the process:
  6. Now navigate to the Start menu and fire up Iometer. The second license agreement will show, but only the first time you launch. Agree to it to continue:
  7. Click I Agree to continue to the first screen. This is the point where I was confused at first, so pay attention. You need to select the system on the left, then click on the drive or drives to which you’d like to send IOPs. Then the important part is to fill in the Maximum Disk Size. If you don’t do this, then the first time you run a test, the program will attempt to fill the entire drive with its test file! Here’s a shot of what it should look like after you’ve selected to create a 1 GB (2048000 Sectors) test file:
  8. Next you should click on the Access Specifications to set up profile for the type of IOPs you’d like to generate. For a Windows system emulating fairly heavy I/O, I usually:
    1. Select “4K; 75% Read; 0% random” in the right column:
    2. Then click Edit Copy and bump up the randomness to 66%:
    3. Then click OK to yield the following:
  9. At this point, you can just click the green flag in the top button bar to start the test. You will be prompted to choose a location for the results.csv file. Just click OK unless you need to change it. I like to visit the Results Display tab first, though, and tweak the settings so I can watch the measurements:

Other Hints and Tips

Location and Size of the Test File

The test file (in our example 1 GB in size) is created either under the root of the drive selected, or under the user’s folder: C:Users%username%AppDataLocalVirtualStore. The name of the file is iobw.tst.

This file is only generated the first time you launch Iometer and is not generated again — even if you close, re-launch Iometer, and select a different Maximum Disk Size. Therefore, if you need to use a different size, you must do the following:

  1. Stop any tests and close Iometer.
  2. Locate and delete the existing iobw.tst file.
  3. Re-launch Iometer and select your new select your new Maximum Disk Size.
  4. Select any Access Specification you’d like, it doesn’t matter unless you want to run an actual test at this point.
  5. Click the Green flag (and save the results.csv location). The status bar at the bottom will show “Preparing Drives” until the iobw.tst file has been built, then the test will start.
  6. At this point you can stop the test and close Iometer. Your new iobw.tst file will be used every time.

I couldn’t find a way to reset the size of this file or remove it from within the Iometer GUI.

Simulating Different Workloads

If you want to throw more IOPs at your storage, you can add multiple worker processes under the main manager process. These workers can be clones of the first one you set up, or they can be new ones set up with different Access Specifications. All of them will run at the same time when you start the test.

A good write-up about Iometer and simulating various server workloads is available on the VMware Communities Forum. That post gives some example settings for simulating Exchange and SQL Server workloads with Iometer.

Conclusion

Iometer is a great utility to use in your Test/Dev environment to simulate workloads. You could also use it to stress test a pre-production environment to make sure you haven’t mis-configured anything, or accidentally created any bottlenecks in your design.

Background

I’ve been happily running this site on Textpattern (version 4.2.0) for a couple of years now with no issues or concerns. It has been a solid platform and I found a good template which I was able to customize to my liking. Recently, however, my wife has expressed interest in starting her own blog (more on that to come), and she wanted to use WordPress primarily because she had used it before.

Over the past couple of months, I’ve been working a lot with WordPress in support of Lori’s effort to bring her blog to life. We’ve been running an internal development site during that time to find the right theme, customize that theme, play with different post presentations and build some content prior to launching. She’s very serious about taking this blog live, so I figured I should probably get serious about learning as much as I can about WordPress.

This post is all about my experience converting from Textpattern 4.2.0 to WordPress 3.0.4.

Finding a Theme and Testing Migration

The first thing I did was install WordPress 3.0.4 on my internal server so I could play with different themes and test migrating my old content. Since I’ve been doing a lot more photography recently, I tried to find a photo-centric theme. After looking at four or five different themes, I settled on F8 Lite by Graph Paper Press. I’m a big fan of its clean, simple grid presentation and the focus on photography.

During my initial testing I discovered that the standard process for creating a child theme under which to make your customizations did not work. I’ve not figured out why it breaks, so for now I’m working with a full copy of the original theme. I’ll have to keep track of what I’ve customized so I can re-apply those customizations when an updated version of this theme comes out (hopefully that won’t be often).

Another issue I found while researching migration from Textpattern to WordPress is that the built in tools for Textpattern migration have been broken for quite some time. Some people have developed some work-arounds, but it seemed the process was hit or miss depending on the versions of each platform in use. I noted, however, that there was a generic import tool which would utilize the old site’s RSS feed to import posts. I tested this out and it worked very well. All the post content was imported (some caveats on that later) and only some minor formatting issues were introduced.

After playing with the F8 theme and my imported content for several hours I decided to go ahead and start the process of migrating my live site.

Migration Preparations

Any successful migration starts with a full backup of the old site so you can restore it should something go horribly wrong. Textpattern, just like WordPress, is a MySQL/PHP based site, so there really are just two things to back up: the database and the site files.

First, I backed up the database with the following:

mysqldump -u root -p txp_database | gzip -9 > 20110116_textpattern.sql.gz

Breaking that down, I called mysqldump with a root account, prompted for that user’s password (-p) and dumped the database called txp_database. Since mysqldump outputs to standard out, I piped that through gzip with -9 for maximum compression, then re-directed it into the final file. I like to put the date as the first part of a backup filename so it is easier to distinguish later if I have a bunch of backup files in the same location.

Next it was time to back up the textpattern site files. This contained all the PHP code plus all of the customizations I’d made to that code and the site graphics. After changing to the directory under which all this lives (varies by server configuration, but could be /opt/textpattern or /usr/share/textpattern) I then issued the following:

sudo tar -czvf /tmp/20110116_textpattern_files.tgz ./

Breaking down this sequence, I escalated my privileges to root with sudo, issued tar to create (-c) a compressed (-z with gzip, use -j for bzip2), with verbose output (-v), file with the given name (-f) containing the contents of the current directory (./). Note that I placed the output file in a different location than the current directory to avoid any problem with the tar process trying to recursively include its output file in the input. It would also be a good idea to move both the MySQL dump and this backup file to a common location for safe keeping — leaving either under /tmp is a bad idea because some systems clear the contents of that folder upon rebooting.

At this point, I could completely mess up Textpattern and I would be able to utilize the contents of these two files to restore it all back to its current condition.

Migration and Importing Textpattern Content

Once all the backups were out of the way, it was time to move the WordPress files and database from my development site to my “live” Web server. This was the tricky bit, as I discovered some of the initial setup was migrated with the database and there was no easy way to re-configure those settings. Most notably, the site URL kept re-directing me to my local dev site after I migrated the files. I ended up starting with a fresh copy of the database, but using my modified WordPress files. I had to re-configure the site and re-import the Textpattern content, but that was easy to do since I already had a dump of the rss feed.

First, I wrapped up my WordPress development files in a tar/gzip file, similar to backing up by issuing the following after changing to the root of the WordPress folder on my development server:

sudo tar -czvf /tmp/20110116_wordpress_files.tgz ./

I then copied that tgz file up to my server and uncompressed it to a WordPress folder by changing to that folder and issuing:

sudo tar -xzvf /tmp/20110116_wordpress_files.tgz

Next, I issued the following sequence to get into MySQL, then issue SQL statements to create a fresh database:

mysql -u root -p
create database wordpress;
grant all privileges on wordpress.* to 'wp_user'@'localhost' identified by 'wp_password';
quit

Breaking that down, the first line opens a MySQL command prompt with root privileges. The next line creates the wordpress database. The third line simultaneously creates the user ‘wp_user’ with the password ‘wp_password’ and grants that user full access to the wordpress database. The last line quites the MySQL interface.

At this point, my old Textpattern site was still live, but I had to configure the WordPress site. I decided to quickly switch over to the WordPress site and finish up the configuration. To do this, I simply had to edit my /etc/apache2/sites-available/default file so it pointed to the location of the WordPress site instead of the Textpattern one. All the rest of the settings in that file remained the same.

Once that was done, I hit the wp-admin URL to complete the site setup and create a site administrator user account. I then logged in as the site administrator and fired up the rss-importer plugin, which I had already installed as part of my development site, and it came over when I copied those files. But first, a word on getting that RSS content out of Textpattern. . .

The rss-importer plugin takes as its input an RSS XML file. In order to generate such a file from Textpattern, I had to go into the site settings and set the RSS feed to present all of my posts in the feed and set it to place the entire contents of each post in that feed. Once that was set, I visited the site and right-clicked on the RSS link, saving that link as a file called rss.file. Within my WordPress development site, I was then able to upload the contents of rss.file into the rss-importer plugin. Here are my caveats about this method and why it worked for me, but might not work for you:

  1. My Textpattern content was all code/text. All of my images were hosted from my Flickr account. I don’t believe site embedded pictures would have transferred with this method.
  2. There is a 2 MB file upload limit in WordPress. I only had 108 posts in Textpattern and the RSS XML file was under 500 KB. I believe you can increase the 2 MB limit, if needed.
  3. The import wasn’t perfect. Some formatting was lost. I spent a significant amount of time going through each of the 108 posts and adjusting the formatting. A better import method may have preserved this formatting.
  4. The categories did not import either. I had to go through all posts and assign categories and tags. I’m not sure if any of the other import methods would preserve categories. I wanted to re-work these anyway, so this wasn’t a big loss.

Aftermath and Conclusion

So, yeah, I had to touch every post and fix some formatting. I also had to set up new Categories and set tags on each post. Good thing I’m not a terribly prolific blogger, or I would have had some tough choices to make. As it was, 108 posts weren’t too bad. The later posts were more complex, requiring more attention. As the posts got older, there was less to do, so the last half to one quarter went a lot quicker.

Overall, I’m happy with the look of the site and the way this theme integrates with WordPress. As mentioned before, I still need to work out the child theme issue, but hopefully I can figure that out in my development site soon. I’m also going to dig into the CSS of the site and change up some of the colors. I don’t like the red article link headers and hyperlinks, and I want some of the fonts to be just a bit larger.

My work on this site will never be done, but that is the way of the blogger. . .

Background

If you aren’t familiar with GNU screen, you really should stop right now and familiarize yourself with it. This is a very powerful utility which allows you to run terminal based programs on a system, disconnect from that session and re-connect later from the same or a different location. You can also start multiple terminals within a given screen session. Whenever I ssh into a system, I almost always launch screen first. If my ssh session gets disconnected unexpectedly, I can simply re-connect and pick up where I left off by re-attaching to the screen session.

The Problem

I was recently working with a client on a process that was going to take quite some time to complete. The command we were running would give a progress indicator, so we could monitor the progress off and on over time. I assumed, since we both had the ability to utilize sudo to change user privileges that he would be able to sudo su – myusername followed by screen -r to take over the screen session I had started which contained this command. When he tried this, however, he was greeted with the following error:

Cannot open your terminal '/dev/pts/1' - please check.

The Solution

Searching around on Google comes up with a couple of different solutions. One of these solutions suggests that the second user should change the permissions on his tty to allow everyone access to it. While this works, it is definitely a Bad Idea for security as any user on the system could then snoop that tty.

The other solution suggests that the second user should issue script /dev/null after escalating themselves to the first user’s account. This works and does not appear to have the same security implications as the method above because everyone retains access to their own tty’s.

But Why Does This Work?

What I found was that none of the posts I ran across which presented the second, preferred solution explained why this works. They merely said, “use this method,” and left it at that. Being naturally curious, and harboring a concern as to whether this also opened up a tty to others’ snooping, I had to investigate.

Prerequisites

Of course, this all assumes that at least the second user has the ability to sudo su – and escalate their privileges. That is all. Let’s move on.

Stepping Through The Process

Here’s how I went about discovering what exactly script /dev/null does and why it allows the second user to access what appeared to be an inaccessible tty.

First, usera logs in via ssh, checks which tty was assigned, checks the permissions on that tty and launches screen:

usera@localhost ~ $ ssh usera@remotehost
usera@remotehost ~ $ tty
/dev/pts/1
usera@remotehost ~ $ ls -l /dev/pts/1
crw--w---- 1 usera tty 136, 1 2011-01-09 20:14 /dev/pts/1
usera@remotehost ~ $ screen

As you can see, usera has RW permissions, group members have W permissions and others have no access at all to this tty. Next, userb logs in to the same system via ssh, checks which tty was assigned and checks the permissions on that tty:

userb@localhost ~ $ ssh userb@remotehost
userb@remotehost ~ $ tty
/dev/pts/2
userb@remotehost ~ $ ls -l /dev/pts/2
crw--w---- 1 userb tty 136, 2 2011-01-09 20:20 /dev/pts/2

Again, the same permissions are present on the tty assigned to userb. So neither user can snoop on the other’s tty at this point. Here’s where it gets interesting, though. Let’s have userb escalate to usera and check the tty assignment and permissions again:

userb@remotehost ~ $ sudo su - usera
[sudo] password for userb:
usera@remotehost ~ $ tty
/dev/pts/2
usera@remotehost ~ $ ls -l /dev/pts/2
crw--w---- 1 userb tty 136, 2 2011-01-09 20:20 /dev/pts/2

This is where I had my “aha moment.” Although userb has changed to usera, the same tty (with the same permissions) is in use. Therefore, all commands issued are now under usera but any command which tries to manipulate the tty (like screen does) will fail because the tty remains under control of userb.

So now let’s take a look at what script /dev/null does to the tty:

usera@remotehost ~ $ script /dev/null
Script started, file is /dev/null
usera@remotehost ~ $ tty
/dev/pts/3
usera@remotehost ~ $ ls -l /dev/pts/3
crw--w---- 1 usera tty 136, 3 2011-01-09 20:36 /dev/pts/3

Ahh, we now have a new tty assigned to this user. Therefore, when screen -r is issued, the currently assigned tty, /dev/pts/3 is accessible to usera and the command succeeds! Also note that this new tty has the same permissions as the original usera tty, so it should be just as secure from snooping.

Conclusion

If you need to share a screen session with another (admin-rights holding) user, then the script /dev/null method is much preferred over mucking around with tty permissions. It appears that the script /dev/null method is just as secure as the original user’s tty because the permissions on the new tty are exactly the same.

On a more general note, be aware that solutions you find on the Internet might work, but they may not always be the best solution for the task at hand. Be sure you understand the implications of what you are doing instead of blindly copying and pasting commands you found on someone’s blog. If you are not sure what a particular solution does, I encourage you to test as I did (on a non-production system, of course) to make sure you understand it before you put it to use.

Gaining Root

This was the hardest part. I have the original Droid, so most of the one-click-root options no longer work since 2.2.1/FRG83D was released by Verizon. Neither SuperOneClick nor z4root worked. After several hours researching I ended up using the method described here to good effect. The main “gotcha” was during steps 9 and 10. Since I was using Linux, I used sbf_flash to upload the SPRecovery.sbf file. On steps 9 and 10, you have to “catch the boot” and this took me a couple of tries to get the timing correct. Read carefully and those instructions should work OK for you, too.

Installing Cyanogen 6.1.2

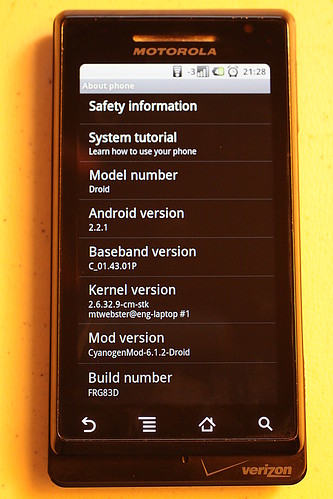
Once root was obtained, I was able to flash the latest CyanogenMod ROM by following the instructions on the CyanogenMod.com Wiki for the Motorola Droid. I was able to utilize the ROM Manager method, and I was up and running with the new ROM in a matter of about 15 minutes. Most of that time was spent waiting for the ROM to download. It was quite a rush seeing the spiffy new Cyanogen splash screen when it first booted up. Here’s a screenshot of the new kernel:

CyanogenMod_Kernel

New Features Added, but Some Things Missing

There were a lot of spiffy UI tweaks and changes added with this mod. Here’s a rundown of the items I noticed and liked:

Home Screen Goodies

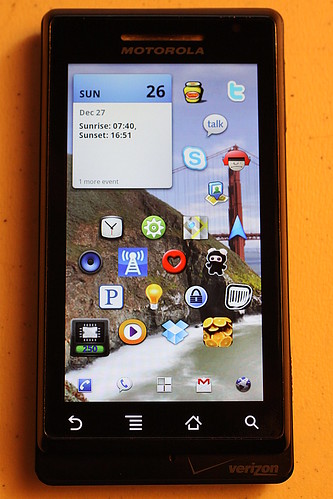
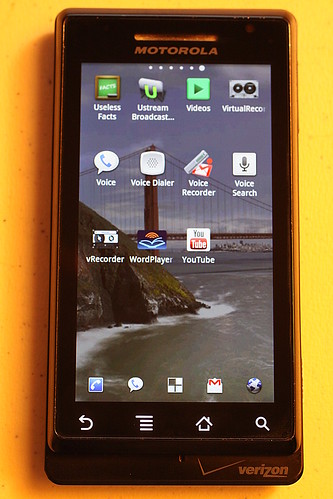
I like to keep my “main” or “center” home panel as clean as possible. Cyanogen adds the ability to add some extra buttons on the bottom dock, making this main home panel much more functional. It also allows you to hide the top status bar and remove the background from the bottom dock, giving a much cleaner look. Here’s my center home panel:

Home_Screen

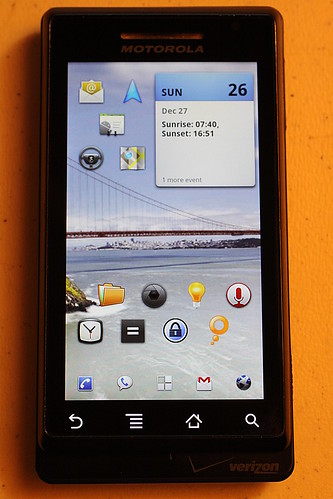
And here are a couple of shots showing the left (where I keep “personal” apps) and right (where I keep “business” apps) home panels. The most notable tweaks here are the ability to add more icons per panel and the removal of text labels from the icons. Not shown here but also notable is the ability to add more panels to the home screen. I’ve not tested the limit of this, but I know you can add more than the default (and unchangeable) 5 that the Froyo upgrade brought.

Left_Home_Screen
Right_Home_Screen

Cool UI Tweaks

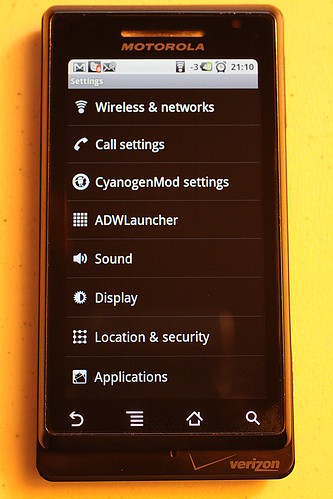
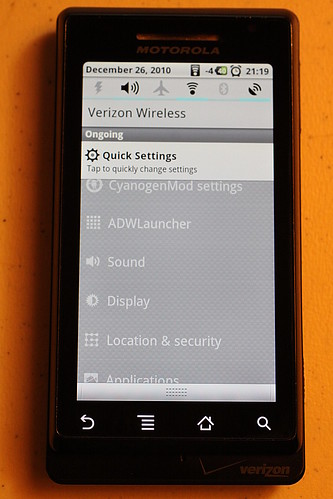
I won’t go through all the menus here — there are just way too many to cover. I will highlight a few of the features which I found neat and/or useful, though. First off, the two new additions to the main settings menu. There are settings for the CyanogenMod itself and the “launcher” known as ADWLauncher:

Main_Settings_Menu

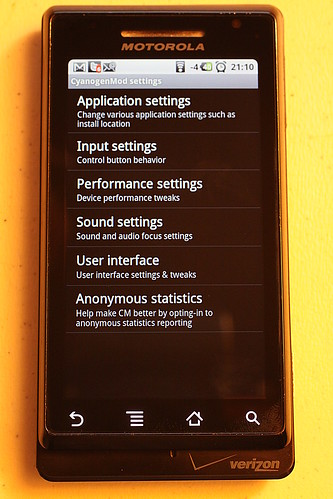
While most of the main UI tweaks are under the ADWLauncher menu, there are a few which show up in the CyanogenMod settings. This next series of screen shots shows how to enable the Night Mode screen render feature. First, start at the CyanogenMod Settings menu:

CyanogenMod_Settings_Main

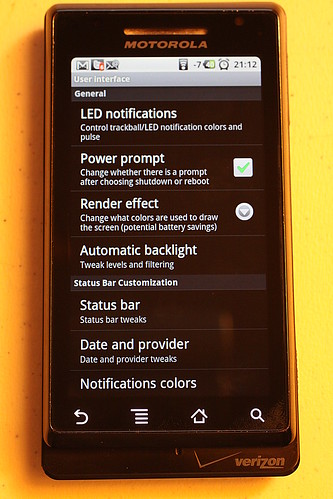
Then tap User Interface:

CyanogenMod_UI_Screen

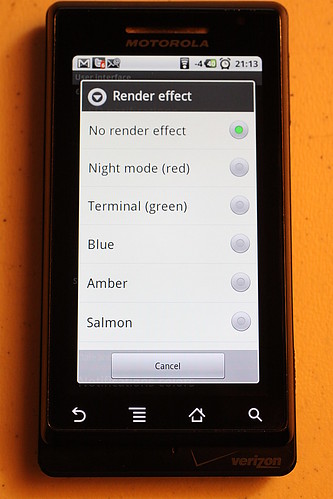
Then choose “Render Effect” and select your render color modification:

CyanogenMod_UI_RenderEffect

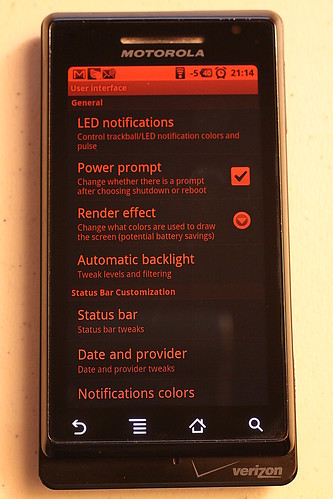
And now see everything in red! I read some hints here and there that said Night Mode can save up to 30% battery life, but I’ve not done any testing myself.

Night_Mode_Menu
Night_Mode_Home_Screen

In addition to adding more customized settings for the home screen, you can also customize the application listing. I’ve chosen a landscape layout with more icons per panel than the default. Here’s a shot of my last panel. Note the “nav dots” at the top showing your current panel. It remembers which panel you were last using and returns to that one.

AppNav_6

The last UI tweak I’ll highlight is the addition of some quick toggle icons to the notification drop-down. You can place up to six of these icons in that space, but there are a lot more to choose from, so you can place the ones you use most here. I have on mine (from left to right) Torch (LED flashlight), Noisy/silent toggle, airplane mode toggle, WiFi toggle, Bluetooth toggle and location/GPS toggle.

DropDown_Extras

What’s Missing?

The new Android Market. I had just received the new market app prior to upgrading to CyanogenMod and now it is gone. I noted that the root access modification disabled over the air updates. This means I will need to keep an eye on the CyanogenMod Web site for updates and apply them manually. When I applied the new ROM, I had to re-configure all of my applications (Gmail, Talk, Voice, Exchange, Twitter, Identi.ca, etc.), but most data like browser bookmarks and applications I had installed to the SD card were preserved. I certainly hope there is an upgrade path that doesn’t require all my account info again. I guess I’ll find out when 6.1.3 is released.

Conclusion

Will I stick with CyanogenMod, or will I go back to stock? Good question. I like a lot of the UI tweaks CyanogenMod brings to the table, but none of them are show stoppers that I couldn’t live without. I suspect most people root their phone and install CyanogenMod to access the tethering ability it adds. I briefly tested this to confirm it works, but I will most likely not use it because I have a Verizon MiFi. I think the main deciding factor for me will be whether or not there is an easy upgrade path to the next version of CyanogenMod. If it doesn’t seamlessly update, then I will likely revert back to the stock ROM so I can get the latest updates over the air from Verizon.

VMware Knowledge base article 1004700 describes the advanced setting to add to your HA setup to disable the warning, “Host {xxx} currently has no management network redundancy.” This is helpful for situations where you do not necessarily need IP redundancy for your management network but do want to hide this warning so that it doesn’t mask any other warnings during production use. The article also describes what is required if you want to configure management network redundancy.

Overview

When a virtual machine (VM) is shut down, part of that process is the deletion of its .vswp or virtual machine swap file. If, however, the host on which the VM is running crashes, the .vswp file may not get removed. When the VM powers back up, it will create a new .vswp file and leave the old one in place. If there are several host crashes, this can start to eat up datastore space, robbing your VMs of space for snapshots or causing issues if you’ve over-allocated your storage.

Procedure

First off, a warning. If you delete the active .vswp file I don’t know what will happen, but I’m sure it will be Very Bad Indeed. Therefore, the most important part of this procedure is to identify the newest or youngest .vswp file created. This should be the one with the latest time stamp on it.

Another way to guarantee you identify the correct .vswp file is to shutdown the virtual machine properly. This will remove the active .vswp file, leaving behind only the extra ones you no longer need. To minimize confusion, make sure there are no snapshots of the VM prior to shutting it down.

Once you’ve identified the active .vswp file or shut the VM down to remove it, you can then use the vCenter client to browse your VM’s datastore and remove the extra .vswp file or files.

OK, so I searched Google but couldn’t find the magic combination anywhere. Hopefully, this post will help you!

The setup: I wanted to compare the contents of two directories which had previously been synchronized via rsync without actually synchronizing them. The main goal was to find out the total size of the data which would need to be transferred so I could estimate how long the actual rsync run would take. To do this, you’d think the following would work, based on the rsync man pages:

rsync -avvni sourcedir/ destdir/

Broken down that is:

  • -a archive meta-option
  • -vv extra verbosity
  • -n dry run
  • -i itemize changes

The output, however, lists “total size” as the total size of all the files — NOT just the size of the changed files which would be synchronized. So I did some research using the rsync man page and some testing with several options combinations and came up with the following solution:

rsync -an --stats sourcedir/ destdir/

Here’s a mock sample output from running that command:

Number of files: 2
Number of files transferred: 1
Total file size: 4096 bytes
Total transferred file size: 2048 bytes
Literal data: 0 bytes
Matched data: 0 bytes
File list size: 82
File list generation time: 0.013 seconds
File list transfer time: 0.000 seconds
Total bytes sent: 110
Total bytes received: 32
sent 110 bytes  received 32 bytes  284.00 bytes/sec
total size is 4096  speedup is 1.23

The particular stats you’ll need to parse are the following:

  • Total file size: (given in bytes)
  • Total transferred file size: (also in bytes, this is the changed data to be transfered)

You can ignore Total bytes sent and Total bytes received as they only refer to the actual data transferred by the rsync process. In a dry run (-n option) this amounts to only the communication data exchanged by the rsync processes.

Also of interest are the Number of files and Number of files transferred statistics. It is also worth noting that the trailing slashes on the directories are important. If you leave them out, what you are actually testing is the copying of sourcedir to destdir/sourcedir which is probably not what you want to do if you are trying to compare their contents.

If this post was helpful to you, please spread the word and share it with others!

The Hardware

The Software

The netbook came with Windows 7 Starter Edition pre-installed. Because that was basically useless, I opted to upgrade it to Ubuntu. After firing up the laptop and going through the initial setup for Windows 7 (which took over an hour to complete), I rebooted the system to Clonezilla and took a drive image. Once I had that image, I wiped the system and installed Ubuntu Netbook Edition 10.04. Out of the box that gave me Firefox, Open Office and several other useful Open Source software products. I added the following items to round out the tools I’d need for the conference:

  • Dropbox
  • Truecrypt
  • KeePass
  • Pidgin

What Worked, What Didn’t

Most of the features I needed worked just fine under Ubuntu. Wireless and wired networking; suspend/hibernate worked flawlessly the whole time. The suspend and hibernate modes helped me extend my battery life significantly, as I could quickly close it to suspend when I thought I didn’t need to take notes and open it to return from suspend quickly when I wanted to jot down a quick note or two. I also tried to remember to use hibernate between sessions to help maximize my battery life, but I probably ended up using suspend most of the time.

While I did not actually benchmark the battery life, I had no problems going a full day of conference sessions without stopping to charge up. I did aggressively use suspend and hibernate modes to maximize my battery life. I also kept the screen at its dimmest setting most of the time — all of the conference rooms and labs were lit low enough that I could easily pull this off. On a full charge Ubuntu reported between 5 to 6 hours of run time at the beginning of each day, and I was able to realize 9-11 hours of usage with my battery-saving tactics. If I remember correctly, the lowest my battery ever got was down to 55 minutes estimated run time.

I discovered that the sound card did not send audio through the audio jack on the side. Sound would work find through the built in speaker, and would cut off when headphones were connected, but there was no audio through the headphones. I’m still researching a fix for this but it was by no means a show stopper.

I was also annoyed that I could not turn off the wireless radio with the keyboard hot key combination. In order to use this netbook on the airplane, I had to reboot the system and enter the BIOS to disable the wireless NIC for in-flight use.

Final Thoughts

I was extremely pleased by the performance of this little netbook running Ubuntu Netbook Edition. It met all the needs I had for the conference. In fact, as I write this I’m doing so from this little netbook while riding as a passenger down an Iowa 2-lane highway using the Verizon MiFi for connection back to my server.

I think this little netbook will remain in my hardware arsenal for quite some time.

Overview

I don’t have all of the numbers memorized, but here’s what I remember off the top of my head:

  • They had about 400 lab stations available, each with a WYSE thin client and two monitors.
  • Everything was “in the cloud” running from data centers across the country, none of them local.
  • Each lab’s VMs were created and destroyed on demand.
  • One monitor had the virtual environment and the other had your PDF lab guide.
  • Over the course of the conference they created/destroyed nearly 20,000 VMs.

Some Problems

I had to re-take a couple of labs due to some slowness issues. These appeared to be due to some storage latency when certain combinations of labs were turned up at the same time. I overheard some of the lab guides asking people to move to a different workstation when they complained of slowness. They explained that, by moving to a different station you would be logging in to a different cluster of servers, which would possibly help speed you up. I opted to come back later and re-take the two troubled labs. I was only able to get in 8 lab sessions as a result. I could have potentially completed 10 or 11.

Most of the time the lab VMs were very responsive and I was able to complete them with plenty of time to spare. The default time alloted was 90 minutes, but they would adjust that down to as low as 60 minutes if there was a long line in the waiting area. Prior to one lab session, I had to wait in the “Pit Stop” area before my session. Here’s a photo I snapped while waiting:

IMG_3174

List of Labs I Took

Here’s the list of labs I sat through:

  • Troubleshooting vSphere
  • Performance Tuning
  • ESXi Remote Management Utilities
  • Site Recovery Manager Basic Install & Config
  • Site Recovery Manager Extended Config & Troubleshooting
  • Vmware vCenter Data Recovery
  • VMware vSphere PowerCLI
  • Vmware vShield

Overall Impression

My overall impression of the lab environment was positive. Despite a few performance issues, I think they did an excellent job of presenting a very large volume of labs. I certainly learned a lot while sitting the labs and look forward to taking more next year. I’m sure the labs team gathered a lot of data which will help them improve the lab performance for next year as well.